If you’ve ever wanted to make a custom embroidered patch, then this is the tutorial for you! We’ve included everything you need to know about how to make embroidered patches with embroidery machine. Trust us, this sewing project couldn’t be any easier.
Patches are one of the coolest forms of machine embroidery, and the great thing about it is that they can be made to fit almost any occasion. Whether you’re trying to show your support for your high school sports team, customize a T-shirt for yourself or a friend, or simply add some design flair to a work jacket or sweater, there are so many ways you can incorporate them into your sewing projects.
Now, you may be thinking that making patches this way is too easy and that you’re not even sure it would work on an embroidery machine. But you’ll be surprised to learn it can actually be really effective.
Table of Contents
What you need:
Basic patch template (for this tutorial, we’re using a 4 x 4-inch rectangle) *The more complicated the design, the less detailed it should be. For instance, if making a patch for your nephew, then just stick with a basic outline of his face and nothing more. For more complex designs, try sticking with just patterns and shapes.
- Fabric for your patch (This can be any material you’d like-we’re using cotton)
- Embroidery thread in the color of your choice
- Sewing machine with a sewing foot and needle installed (You can use a combo pack of both here too) *The sewing foot should have a guide on it to help keep the patch in place.
- Embroidery hoop (This will be used to help ensure that your patch is the same size and shape as it will be when you’re finished.)
- Iron and ironing board (these will be used to press the patch into shape after you’ve sewn it)
- Scissors (you’ll use these for cutting off the excess fabric surrounding your patch)
Here’s how to make embroidered patches with embroidery machine step by step mechanism diagram:
Here the mechanism step by step diagram is given below
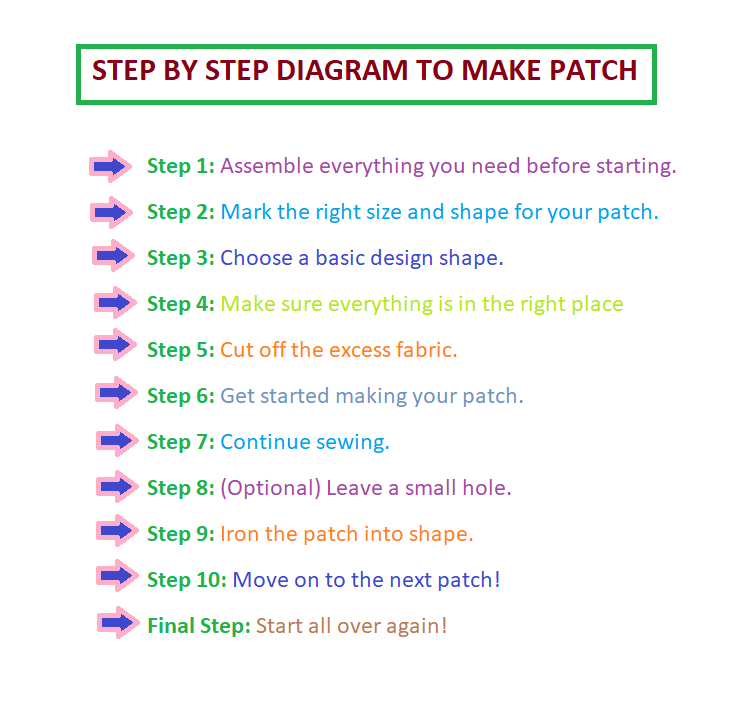
Description:
Step 1: Assemble everything you need before starting.
Put everything together before you start. This will ensure that you don’t have any problems later on.
Step 2: Mark the right size and shape for your patch.
Once you have everything set up, take the template for your patch and trace it on to the center of your fabric with a pen or pencil.
Step 3: Choose a basic design shape.
Now that you’ve got your fabric and template all set up, you can start playing with the different options available to make your patch more appealing. Sometimes, simple designs are most effective. For this project, a 4 x 4 inch design is perfect because it’s small and simple to replicate. If you have a bigger or more complicated design in mind, try making a smaller or larger patch instead.
We’re sticking with a simple rectangle for this article.
Step 4: Make sure everything is in the right place.
When you’re choosing and placing your design, make sure everything is facing the right direction. All letters and numbers should be written on top of your patch, not beneath it. Also, make sure that all other elements are facing outwards so that they can be viewed from the front of the patch once it’s complete.
Step 5: Cut off the excess fabric.
Once you have your design placed and you’re sure that it’s facing the right direction, cut off any excess fabric to ensure a clean edge when you’re done.
Step 6: Get started making your patch.
Now it’s time to get started! Open up your sewing machine and place the embroidery foot on top of the needle. Then, simply begin sewing along the edge of your patch. You can use the guide on the foot to keep your patch in place.
Step 7: Continue sewing.
Keep sewing along the edge of your patch until you’ve got it as close to your desired size and shape as you can. You may need to pull a few stitches out at this point, but as long as you keep going, they should go back into place once you remove the pressure. Your patch should be tightly sewn and held in place by the embroidery foot.
Step 8: (Optional) Leave a small hole.
You may want to leave a small hole at the top of your patch if you plan to add some stitching or buttons on top of it. This will allow you to stitch it directly onto your fabric without interference. If this is what you want, then start by skipping straight to Step 9 next.
Step 9: Iron the patch into shape.
Once your patch is sewn and shaped, it’s time to press it into shape. The small hole you made in Step 8 should still be visible once you’ve pressed the patch. This will allow you to put your sewing machine tension on completely even before placing the foot onto the needle. Then, just go ahead and press down gently along the edge of your patch with a flat iron. You should be able to press it into shape without too much trouble if you do this correctly.
Step 10: Move on to the next patch!
As soon as your patch is pressed into shape, move on to the next one. If you’ve got multiple pieces that need some attention before you’re done, then just put one aside to work on later and continue working on the others at once. When you’ve worked through all of your patches, you can carefully remove the embroidery foot from your sewing machine and store it away.
Final Step: Start all over again!
That’s it for patch sewing! With a little practice, you should be able to sew perfectly even patches without a hitch. Patch sewing is a useful skill that requires very little work to be completely mastered.
Some useful FAQs for making patches with embroidery machines.
What material can you put patches on?
We recommend canvas or cotton as the best fabric to use for patches. These fabrics are easy to work with and can be bought from any craft store.
What is the best machine for patch sewing?
Our answer to this question is that every machine is the best one for patch sewing if you’re a beginner! There’s nothing special about patch sewing and even if you don’t own an embroidery machine, you can sew patches easily by hand.
How to set up an embroidery file to make a patch?
You can make a patch by simply choosing the “patch sewing” option from the menu. After that, you can just use any other design to make the patch and there’s no real special setup for patches. Just follow the steps above in order to sew your patch perfectly!
How to correctly iron a patch?
The answer to this question is that it depends on what kind of fabric you use for your patch. The heat resistance of cotton is very high whereas in general, canvas is medium. The standard iron settings are fine for those materials. If you want to make sure you have the smoothest and most professional finish, use an iron with non-stick plates. These create a smooth, even finish without damaging your cloth.
Can I sew patches on clothes?
Sewing patches on clothes is quite easy but before doing so, check the washing instructions to make sure that your piece of clothing can stand washing in a machine.
Conclusion:
Hope you enjoyed reading this article about patchsewing. Make sure to share it with your friends and family. In the meantime, we will keep you informed about any new updates regarding patchsewing. Don’t forget to follow us on Facebook and Twitter in order not to miss any news. Share your thoughts in the comments below and tell us which patches you’ve made
Source of information:
You can read another article:
- What Is an Embroidery Machine?March 13, 2021 2 Comments
- How to Choose The Right Embroidery Machine Guide for 2021April 5, 2021
- What is Embroidery Floss: The Ideal way of Hand Designing for StartersMarch 9, 2021
- How often to Service Embroidery Machine?March 15, 2021
- How Many Threads To Use For Embroidery? 5 Special Thread Info